Showing posts with label trees. Show all posts

Monday, October 10, 2011

Colorful Aspens class results

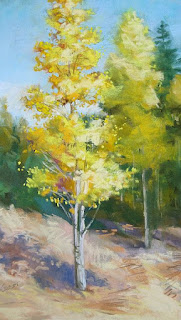
Aspens, 12" x 7", pastel

At last week's class we took a closer look at the anatomy of these lovely aspen trees, examined the bark a little, and discussed how to paint the light, leafy foliage and sky holes. Above you can see my demonstration painting, completed in the course of that day.
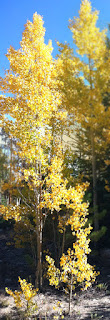
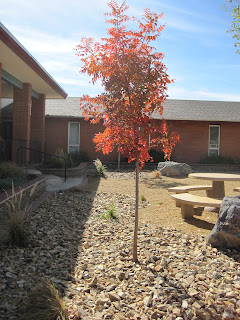
I cropped it and saturated the color of the original photo, blurring the tree behind it so I wouldn't be tempted to paint too much detail there. I removed the scanty little trees in the foreground, and reshaped the foreground considerably, as you can see. I never meant to copy the photo--in fact, it only launched my thinking and helped me to show the students how to begin the drawing/painting process. Very soon I brought to it the memory I have of the lively look of these lovely trees that shimmer in the breezes. For the purposes of our demonstration I wanted to draw near enough to show a bit about how to paint the bark and some of the details of foliage.

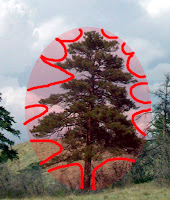
My best advice, when painting taller trees particularly, is to find the entire outside geometric shape of the foliage and trunk. In this case I began with a long, slim oval. If a few leaves protrude beyond the edge of that initial shape it's no problem, but encompass the entire top-to-bottom, side-to-side shape in essence. In this case I let the treetop go off the page and shrunk the trees behind it for more of an organic sense of perspective.

The light colored bark is diagnostic, but please don't use too much white to paint it. Find many colors that may be combined to create 'gray', the color that really best describes this bark, both in the sunlight and shadow. Don't pick up your standard, everyday gray. Locate the darker (not black) striations in areas where there might be stress, such as where branches protrude or the tree flexes in the wind.

Foliage is open and leafy, with the 'balloons' often elongated and loose. (See the chapters on how to paint trees and how to paint foliage for further information.) Use a characteristic rounded shape to describe aspen leaves, utilizing the 'haiku' approach at the intersections of the balloons of foliage, the sky or background. Details should be implied, not over-described.The color of the foliage can be almost a rainbow, with emphasis on warm, pale yellows, oranges and greens. Flavor those colors with lavender or magenta underneath, to give *pop* to the colors, relying on the blue sky behind the oranges for the same.

Sky holes shouldn't be mechanical, large-medium-small holes where the balloons intersect, but should be well designed, rhythmic and visually interesting. These openings give the tree dimension and help to lead the eye around the tree. Smaller gaps are slightly darker in value (but the same color) as the sky, because of intervening small branches.

I hope everyone is having fun painting these colorful, lively trees.

Keep going, gang!
Deborah


Friday, March 25, 2011

Stylized Negative Trees class results

Spring Pinks, 12" x 9", soft pastels on yellow Pastelmat

This class is meant to help you see the rhythm, balance and shapes of different trees. Start by looking at the overall outside shape of a tree: Is your tree an oval, triangle, square, rectangle or a circle? This should include all or most of the upper branches, but not slavishly. Squint to decide, and if a few little branches or leaf clusters are lost that’s okay.

First, in your sketchbook draw the geometric shape of the tree and fill in the area with charcoal or pencil. Then remove the shapes that describe the overall branch patterns. 
 
This is partly to see what’s actually there, but I also want you to spend some time designing the shapes. Don’t allow any indentations to be identical is size, scale or shape. Trees tend to repeat patterns, but artists look for interesting visual variations.


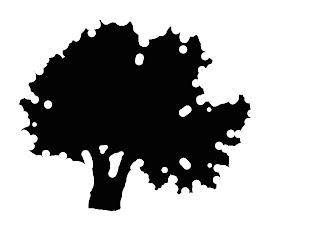
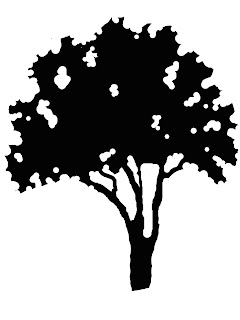
I like to do this in Photoshop. Make a positive shape filled in with black, and use the eraser tool to remove the negative ‘sky’ shapes. Whether you use charcoal, a pencil or your computer, the trick here is to keep thinking of the negative shapes as much as you can. Design these to be varied and rhythmical and you’ll arrive at an interesting shape. Don’t try to draw the background, only think of it as empty sky behind the tree. Don’t look at them as trees, but tree-like patterns.

Find the sky holes that are most descriptive, including the trunks and branches if you can see them. Scale may play a role in this, in that a smaller tree with flowers on it may show far more gaps, while a larger tree may only show a few. Squint to decide which ones are key and what can be ignored.

I want you to approach the painting the same way, to some degree, as a positive tree against a negative sky (or background). Sketch from your design the interesting and varied tree shape you chose. Don’t look at the photograph of your tree, only your drawing of it. Think flat! 


Take some time to get this shape recorded on your paper. I use charcoal to do this. You may find yourself wanting to tweak the drawing as you go along, so at that point you can begin painting. But here’s the catch—only paint the negative. It might be best if you tone white paper or use a colored ground for this. Carve away the shapes with a color or colors.In the demo below I used Wallis paper toned magenta, drew the outline with charcoal, and carved away the negative with sky blue.

quick demo carving away negative shapes only
The painting at the top of this blog post is the one I did during class from the exercise. I think seeing the negative shapes helps--you really have to paint what's behind before you paint what's in front. I began with a charcoal shape drawing, then added the grass, far greens of the trees and the blue of the sky, thinking negatively. Then I completed the tree.

Have fun--and keep going, gang!
Deborah

Monday, March 21, 2011

Class 2— Mar. 24 – Stylized Negative Trees

'Apple Tree', gouache

Class 2— Mar. 24 – Stylized Negative Trees
We’ll explore painting three different trees using a technique that carves away the negative spaces. Bring photographs of three different trees that you can view completely from top to bottom and side to side, or nearly so.  You’ll make one painting containing all three trees, much like a botanical illustration, using the negative painting technique. 
__________

The 'style' I refer to in the title of this class is about the approach to seeing and drawing the trees, not necessarily creating a negatively painted tree, as you might have envisioned! No, this isn't a dark where there should be light painting, it's a tree designed by carving away the negative shapes. You'll see a demonstration explaining the process, which will employ some of the same steps we used in this class

You have a choice. You can either use a small sheet of paper for each tree, or one larger sheet on which you paint each tree individually. I simply want you to approach each tree as a separate project. 

Please find photographs that clearly show the entire tree, of any type, in full leaf or bud, of any size or shape or age, in the spring, summer or fall (excepting bare winter deciduous trees.)  Try to find ones where you're easily able to sort out the tree from its background, not a grove that makes it hard to decide where one starts and the next stops. 

Feel free to use any of these photos, with my permission, for your paintings.


Bring the paintings you began last week of rocks underwater, as well as your drawings, for a quick critique. 

See you on Thursday!
Deborah


PS I suggest you consider signing up for this webinar on Tue, Mar 29, 2011 11:00 AM - 12:00 PM MDT: FREE Online Event: Painting from Photographs with Maggie Price

Saturday, February 19, 2011

Evergreen Trees class results

Pine tree demonstration, 12" x 9"
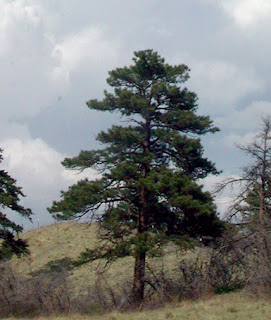
Pine trees are a subject we all encounter in the southwestern landscape. My challenge was to take one of the four photos I posted and put it into another setting. For my demonstration I merged these two photos using Photoshop:


I ended up with this resource photo, which I used for the painting you see at the top of this post.

My first question was how I might recompose to make it a more interesting painting. My students and I brainstormed ideas, and I decided to crop the sky, angle the horizon into more of a mountain shape, and give more perspective to the pathway by widening it at the front. I wanted the pine tree I added to be the star of the show, as I believe it has!

To backtrack a little, this is how my demo looked after the first pass:

__________________
Let me remind you of some facts about tree in general and pine trees specifically. First you must understand the anatomy of a tree in order to paint it properly. Just as a portrait painter must have knowledge of the bone structure underlying the face, you must understand the skeletal underpinnings of the tree, but because of the fact that pine trees never shed their foliage it’s difficult to understand the underlying structure. However, all trees have certain elements in common.If you were able to look down on a pine tree from the top you’d notice how the branches spiral out in a loosely radial pattern along each trunk. This pattern is repeated over and over, in the habit of trunks, branches, needles (which are leaves), and pine cones. In order to picture this design, think of the barber pole where the spiral rises continuously. 
A tree rarely puts out branches at even and opposite intervals along the barber pole. One of the reasons an artificial Christmas tree looks fake is the intervals are too exact, with a branch sprouting out at perfectly opposing and predictable distances, unlike the real thing. On a real tree, the larger branches develop smaller branches in a roughly radial spiral pattern, as the tree grows taller. This corkscrew arrangement generally holds true for all trees, including pines.
Trees are radially symmetrical, meaning both halves are roughly the same, sometimes even more so in pine trees, which can be almost perfectly conical in shape. You could place a mirror at the center of the tree and see a matching image. However, try to paint your pine tree so that it isn’t simply made up of two identical halves but has asymmetrical qualities that make it more interesting.
Remember that trees must be balanced to remain upright, although their tenacity is amazing. Once the root system is well established a tree can remain upright even when part of it is severely damaged. A lightning strike can destroy as much as half the tree and yet it can live on in its injured state because each trunk achieves a certain balance on its own. In the arid southwest near my home you can sometimes see a tree that’s growing along an arroyo, the bank of which has eroded away and left the tree growing horizontally out of the wall. The tree has righted itself and grows up toward the light with a 45 degree bend in the trunk. All of the other branches have arranged themselves to balance the tree in its upright growth.

Pine trees come in many varieties, from blue spruce to piƱon to towering ponderosa pines, but all share some common traits. The general value of pine trees is medium-dark to dark, depending on the light source and the time of day. Shade the green of pines with a drift of orange in the sunlight and a hint of purple in the shadows, to excite the green.
Pines usually grow well only at certain altitudes, so you find one type predominating in most areas, though there can be a mix of one or two varieties, as well. Pines generally don’t have an open growth pattern but are dense and closed, except at the very outside edges. A few pines tend to grow in a slightly more open pattern, especially long-needled ones.
The classic ‘Christmas tree’ shape, a wide-based triangle, is characteristic of only a few pines. Most tend to have a much more cylindrical shape and taper only slightly at the crown of the tree. Analyze the overall shape before painting a pine tree and throw out any preconceived ideas you have. Don't let your pines become a solid wall! Remember that the wind blows through them, so keep them slightly open, which will create a sense of 3-dimensionality.

___________________


As a rule I suggest you approach painting your tree this way: 
Using Wallis paper, tone it any color you like using a foam brush. 
Locate where the trunk emerges from the ground.
Find the thrust—the angle of the overall tree.
Locate the top limit and outside edges.
Draw the geometric shape overall.
9" x 9" Wallis paper, toned blue violet, charcoal sketch
Carve away the negative shapes. Let me show you an illustration that might help you understand this better:
Find the geometric shape and then carve away the negative shapes.
Locate trunk and major branches.
Determine the angle of the sunlight and shadows.

Charcoal underdrawing in place
Consider the background first.
Paint what’s behind, intruding into the tree’s shape.

Add purples beneath shadowed foliage.
Add oranges beneath sunlit foliage.

Find a characteristic stroke that mimics the pine needles.
Use that detail in areas where balloons of foliage intersect or the foliage is against the background.
Add greens over the other colors, starting with the dark and proceeding to the highlights. 

And here is the resulting painting, not quite finished yet:


If you would like to view an animated loop of this painting, you can view it here in a thread I posted at WetCanvas. 

Keep going, gang!
Deborah

Monday, February 14, 2011

Class 5— Feb. 17 – Evergreen Trees


Evergreens constitute a lot of the trees you see in the western landscape, so for this class we'll take a closer look at how to approach painting them. We'll visit the rules and at class I'll discuss with you the challenge I have for you regarding painting them.

I've posted several photographs here so you can play with them. You have my full permission to use these for paintings with no reservations or copyrights. Make some drawings, recompose on the computer, or do notan/ thumbnails to get your mind ready to paint. Combine several photos or transplant your tree in the composition, or into another place altogether. We will paint these in class after seeing a demonstration showing you some of the key elements you might want to consider. The idea is to use the “rules” but customize things, enhancing the painting in your own way. 

Here are a few elements to consider:
  • What is the overall outside shape of this tree, reduced to basic geometry? Is it an oval, triangle, rectangle or another shape? Where will you locate it on the page?
  • Analyze the largest openings in the tree to see where an how the shape is pierced. How does that contribute to the balance of this tree?
  • Examine the contours of the outside of the tree, noticing the edges etched against the background. Is the tree symmetrical? How might you use this to your advantage in the composition?
  • Look at the setting the tree is in. What indicates to you that it is growing out of the ground? Are there other trees in proximity? (Or will you add them?) If so, what is their relationship to the star of the show?
  • Can you characterize your tree in some way, as male or female, happy or sad, or in other ways emotively expressive? How could you enhance this impression in your finished painting?
There's a lot more to demonstrate and discuss. Come prepared to paint a portrait of a tree. You may use any paper (I still have Wallis available), any size or color. Bring your ideas sketched out using the photos here. Combine them in any way that pleases you, or add other elements found in your own photographs, or put them in another location entirely, but utilize one or more of these photos in your composition. Please don't paint it ahead of time. We'll paint together in class on Thursday! 

See you then!
Deborah