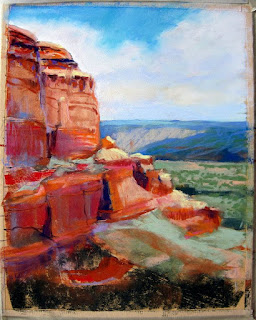
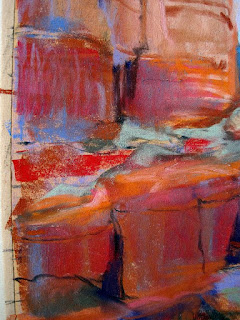
I demonstrated using stick pastels on yellow Pastelmat this week, to show the process of building up to the details. It's not finished yet. Here's a shot of it, and a couple of details for you to examine. I like to keep things very loose and build up to the details slowly. As I worked on this demo the area of greatest interest emerged as the middle-right section of the painting where the light is strongest.
All rocks are shaped by pressure,
temperature, erosion and friction. Most notable is the wind that blows dust and
sand, smoothing and sculpting rock; the falling rain, flowing water and
crashing waves that tumble and carve rock; the scorching heat and sub-zero cold
that stress and crack it; and the tremendous forces of rock sliding over rock
that pares it away with the ever-present pressure of the earth itself. Time and
gravity move and change rocks. They’re slowly pushed up into mountains or
sifted down riverbeds and gradually ground away, becoming smaller and smaller. We
don’t sense this change because it happens so slowly. Rocks seem stable,
constant, firm. It’s this seeming permanence that must first be communicated.
Look for the special way that rocks relate to one another,
whether the rocky face of a sheer precipice or a pile of loose boulders that
have tumbled together. The weight of rocks causes them to fall to the lowest
point possible, often leaning into or on top of one another. Even the rocky
faces of a mountainside lean together as one giant cliff, made up of many
facets, most often slightly receding as they climb upward. Smaller stones are
then slowly sifted into crevices or between and around boulders, creating more
visually engaging complexity.
As always,
I recommend you do a good underdrawing, sorting out all the planes of the rock.
Find the relationships of the cliffs, how they run into one another and change
angles, how the details of light and shadow show depth.
Start with
three values. Find those rocks that are darkest and be sure to get them in
place, then look for the medium values -- usually where the most color will
reside. Then look for and establish the lightest values. Be sure you understand
where all the various planes of the rocks lie. Look for characteristic
fractures, striations and places where wind has worn the rock smooth. Draw in
any holes, caves or hollows using light and shadow to indicate them. Draw
stains and chelation (where salts have risen to the surface) accurately in
order to paint accurately. This is the part of the process where you can
resolve any difficulties, simplifying anything that is too complex for you to
portray.
Because
cliffs are large and upright, usually they will face into or away from the sun
to one degree or another. This means that you must identify the direction of
the light and stay consistent throughout the painting. Remember that the angle
of the sun remains the same, though various rock planes may jut into it or be
deeply hidden from it. Shadows have no random shape of their own so be certain
that the angles of the shadows and light explain the various rock planes to
your viewer. Shadows shouldn’t be too black. Be sure to make them colorful,
using a variety of dark blues, browns, reds or purples. Don’t let sunlit areas
become overly chalky and whitish in color.
The cliffs
may be any color, but around New
Mexico we find red rock cliffs. If your cliffs are
red you have a chance to use a large variety of pinks, oranges, purples and
yellows, even greens and blues. If your cliffs are gray be sure to construct
grays using tertiary colors (red, yellow, blue or green, orange, purple) or
complementary colors in your palette (red and green, blue and orange, yellow
and purple combinations) rather than picking up your gray pastel first. If,
after layering them or using them as broken colors, you haven’t arrived at a
good gray, it’s perfectly acceptable to use gray very lightly over the top,
allowing some of the other colors to emerge.
Take into account linear perspective, especially where there are strong striations in the cliff face. Find your eye level, where the straightest level occurs, and establish the proper angles for the strata above and below that line. A strict vanishing point isn't necessary, nor is any strong adherence to plumb or level lines. Let the cliff remain natural and not forced looking, but respect the linear perspective to give an additional sense of depth to your painting.
Use
characteristic vegetation in your painting to soften edges and contrast with
the rock cliffs. Be careful not to obscure too much of the cliff with trees or
other vegetation or you’ll lose the continuity of the rocks. Pay close
attention to scale. Nothing destroys the illusion of depth like a strangely
out-of-scale tree or bush.
To give the illusion of space in your rock cliffs you must
remember the laws of aerial perspective. Blue each color slightly and lighten
it as it recedes from the eye. Soften edges and diminish details in the
distance, and lessen value contrast in the distance. Save the interesting
details for the foreground rocks.
I look forward to seeing what comes of this class exploration.
Keep going, gang!
Deborah


